
Hiking Dude Blog
2025 - Aug Jul
2024 2023 2022 2021 2020 2019 2018 2017 2016 2015 2014 2013 2012 2011
02/24/2012
2nd Quilt
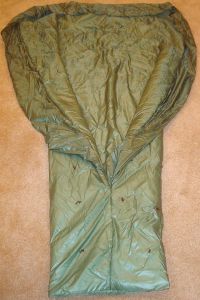 It may be too light for my AZ hike, but I expect it to be perfect for summer backpacking on the Ice Age Trail in Wisconsin. This sleeping quilt has only almost 1 inch of loft, but takes up a lot less space than my first quilt so it's tempting to try it earlier. I'll test it outside this weekend and see how warm I stay.
It's green rip-stop nylon and a bit shorter and skinnier than my first in an effort to reduce weight. It weighs 1lb. 15oz. I was hoping it would weigh less, but I think the insulation I used is heavier for the amount of loft - in other words, not as good as expected.
The quality of insulation is really key to a warm quilt with less weight. Down has the best loft to weight ratio, but messy to work with, expensive, and loses loft when moist.
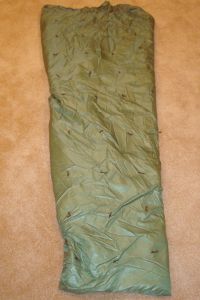 This synthetic insulation will maintain loft better when wet which makes me a bit more comfortable on a long trek. Hopefully, I'll never find out just how well it holds up. :-)
It only took me about 2 hours to make this quilt. Since it's mostly just long, straight stitches, there's not much to it. Keeping the many thick layers laying flat and in line is the most difficult part.
Fortunately, my neighbor had some extra brown yarn for the quilting laying around when I found out we had none. It's a good thing I'm leaving on my hike soon or I'd probably wind up making a third quilt somewhere between the first two in thickness.
Hike On
02/23/2012
DIY Pack
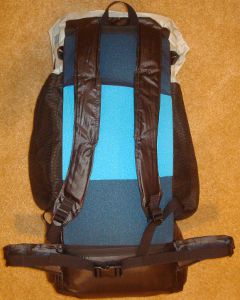 Yes, Mom, I made it myself!
With very little seam ripping and only two permanent alterations (mistakes), I've got my pack I plan to use for 2,000 miles this summer. It is a G4 pattern that I purchased online and sewed at home.
I've been hiking with the pack filled to about 24 pounds this past week and it carries just great. I've added cut pieces of 3/8inch foam pad to the shoulder straps and waistbelt instead of using socks and gloves for padding. I figured the extra 1.1oz. is worth the comfort, and it IS much more comfortable. I also just designed and made slip-on waistbelt pad extenders last night. These have a belt-wide strip of foam to cover my front hipbone that often gets bruised.
Here's more info:
- Weighs 12.2oz. plus 2.4oz of removable foam pad
- has about 4000 cubic inches
- top-loading main compartment and three large mesh outside pockets, plus 8 tie-on points
- has no frame - uses foam pad for support
- made of 2.2oz. grey rip-stop silnylon and black oxford
- adjustable shoulderstraps and waistbelt
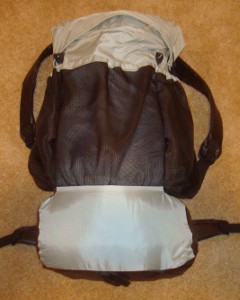 I made mine grey so it matches my quilt, hat, tent, and beard. ;-)
It seems to have plenty of room for my main gear and I've not used the side pockets yet. I expect to fill those with water during my Arizona hike in a couple weeks. My sleeping quilt gets stuffed in first to fill the bottom and raise the heavy stuff up a bit. I don't squish the quilt down too much, but use the weight of gear above it to compress it down.
I just have one section of a blue foam pad for the back. Most people use a foam pad for sleeping and fold it up to provide the pack structure here. I'm using an inflatable pad instead, but it's 72 inches and I need 78 or my feet are on the ground. So, I lay the pack under my feet and have plenty of insulation and comfort there.
There is quite a bit of stress on the pack where the shoulder straps and waistbelt connect to the pack since this is where all the weight hits. I've double bartacked those points and the material seems to be plenty strong to handle the stress. I guess we'll see as I make my way from Mexico to Utah next month.
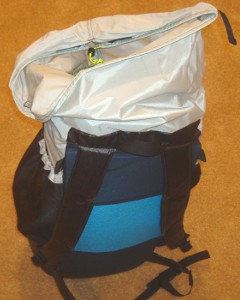
The top has a drawstring and two velcro strips to hold it shut. This top collar can also be extended up if you have a big load. But, be careful about overloading the pack - it's lightweight and should not have more than 25-30 pound load in it.
You can see how the pack top loads here. By packing sleeping gear first, you don't need to dig deep until it's time to set up camp. Keeping the daily needs, such as food, water, maps, hat, filter on top or in mesh pockets makes rest breaks easier to manage.
Oh, the two alterations I made?
- I attached the pack back and sides incorrectly which subtracted about 400 cubic inches of the bottom area.
- One seam on the collar faces out rather than in - I blame that one on the instructions, though.
Hike On
02/21/2012
2B2B
 2 Busy 2 Blog
This entire past week, I've been too busy to blog. But, today I got to take a big breath and relax!
In a nutshell, here's what I've accomplished:
- Finished sewing my backpack (pics soon)
- Sewed a 2nd sleeping quilt (thinner than first)
- Hiked about 40 miles (hills with my trek poles)
- Presented Wilderness First Aid training all weekend
- Got a couple new supporters of my long hikes
- Got new shoes for my AZ hike
I emailed some boy scout troops in Arizona, letting them know about my hike plans for the Arizona Trail and how they can join my ScoutStrong Challenge - you can too. Some are hoping to hike with me somewhere along the trail. One guy might let me stay at his cabin. And, another might help me reach the trailhead and hike the first few days with me.
I've also chatted with some AZ hikers online and they've been very helpful with trail, water, and planning questions. It's looking like I might have a place to crash in a handful of towns along the trail which will be so cool!
Hike On
Leave Comment
Posted: 02/21/2012
Posted: 02/21/2012
02/14/2012
Don't Forget
 Between all your meetings, exercising to stay in shape, starting on taxes, deleting spam emails, checking out youtube videos, and the millions of other things that take up your time today - don't forget.
Even if you hate chocolate - don't forget.
Even if you feel it's just a Hallmark Holiday - don't forget.
Even if you think killing flowers goes against Leave No Trace ethics - don't forget.
Hike On
(and don't forget)
Leave Comment
Posted: 02/14/2012
Posted: 02/14/2012
02/12/2012
AZT Maps
 One step closer to being ready for the Arizona Trail.
I received a brand-new map set on CD of the entire 800+ miles of trail on Friday. The maps are 1:28,000 scale and each image prints on an 8.5x11 sheet.
These maps are very detailed and should be perfect for navigating. The AZT Association at aztrail.org has overview maps which are great for getting familiar with the trail, but not detailed enough for navigating.
Now that I have these maps and my compass, my navigation needs are met.
I spent yesterday printing and refilling my ink cartridge :-)
Printing front and back gives me 65 sheets to carry - that's almost a pound of paper! I plan to carry about a week's worth of maps at a time and ship the rest ahead in a bounce box. Every day, I hope to cover 3 pages of maps which is around 20 miles.
I'll mark spots where I take pictures or other interesting bits and then dump the used pages back in the bouncebox at the next resupply point.
These maps were created by, and being sold by ($25), Brett Tucker at simblissity.net but the profits go right to the AZ Trail Assocation for sustaining the trail. Brett has done an excellent job on an extremely useful project to benefit the hiking community.
Hike On
Leave Comment
Posted: 02/12/2012
Posted: 02/12/2012
02/11/2012
Comments
Please send me an email if you have problems using the new Comments on the site. You should be able to comment on any page, not just blog posts.
Hike On
Hike On
Leave Comment
Posted: 02/11/2012
Posted: 02/11/2012
02/03/2012
Sewing Problems
 Any idea what this is? It's plastic, less than an inch across, and weighs very little. But, without it, I'm unable to complete my current sewing project - my backpack.
It's a top vertical gear from my Singer sewing machine. Actually, it's a replacement that's on its way since I ordered it earlier in the week. My current one has a crack in it so I can't sew.
Once it gets here, I have the task of taking the machine apart, replacing the gear, reassembling, and hoping I don't have too many screws left over. I once helped rebuild the engine of a truck and we had a handful of bolts and stuff left over, but it still ran.
My wife said I should just buy us a new sewing machine since this one is over 20 years old. I could get one for under $100 and this gear is way down inside the machine, so I was in agreement. But I found the replacement gear through a little online research for just $10. Since the sewing machine is dead without it, it will only cost an extra $10 and 5 days if I fail and don't get it all put back correctly.
So, I learn yet another lesson in making your own gear. :-) But, wait until you see my finished backpack - I think it will turn out great!
Hike On
02/02/2012
MYOG Quilt
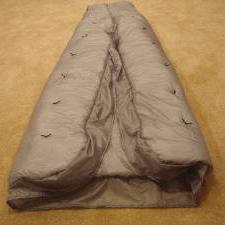 Heavy zippers, squished insulation, no wriggle room - who needs it?
I've finished my sleeping quilt for my first long hike. Even my wife was impressed at how nicely it turned out! From my point of view, it was very easy - so easy I'm making another one.
Sleeping quilts are making steady headway against sleeping bags, especially for long treks where light loads are desired. Actually, a lighter load is always a benefit no matter how long your trek is, but carrying a 4 pound bag for two days doesn't wear you down as badly as lugging it around for two weeks.
A quilt works by laying over the top of the backpacker and being tucked in on the sides as desired. Laying on a pad gives underneath insulation, just like when using a sleeping bag. There is a foot box area which keeps the quilt on and tucked in below.
 So, why the quilt? When you think about it, there are many benefits:
- More Efficient - the insulation you lay on gets squished and loses its loft. That means it doesn't insulate. It's really just extra weight and expense.
- Lighter - no zipper, no insulation underneath, lighter fabric
- Flexible - the quilt can be wrapped around snugly or loosened up. It can be completely thrown off or lain on during warm nights. I can move my legs and body around without feeling quite so like a caterpiller.
- Customized - any MYOG (make your own gear) item can be made specifically to your size or needs. I made this quilt longer than normal and left off a part I didn't want.
I learned a lot from making this quilt.
I made it wider than I really need which means about 7 square feet of unnecessary fabric and insulation, which equals extra weight. My next one will be slimmed down.
It has about 2 inches of loft on top - that's a lot, just measure your own sleeping bag's thickness. My next one will have just about 1 inch for my summer trips with warmer nights.
It's very easy to make a quilt, and it doesn't need to be perfect. As long as you make sure the stitches are hitting all the layers of fabric, it turns out just fine.
I'll easily stay warm below freezing with this quilt. I'll try it on my back porch if we ever get some more cold weather, but I'd bet it will do just fine down to around 20 degrees and then I'd need to put on extra clothes. It weighs 2.5 pounds which I feel is fine for the range of temps I can use it in. The fabric is 1.1oz silnylon and the insulation is continuous filament polyester - goose down would be lighter, but messy working, more expensive, and susceptible to moisture.
I expect my second quilt to be good to around 40 degrees and weigh closer to 1 pound - but we'll see.
Hike On
Leave Comment
Posted: 02/02/2012
Posted: 02/02/2012
02/01/2012
CDTA to Cease Operations
You may never hope or dream to hike the Continental Divide Trail, but this tidbit should be of interest to anyone that ventures into the wild places.
On the home page of the Continental Divide Trail Alliance, they've posted notice that the non-profit organization is ceasing operations and closing down over the next few weeks.
They mention the lack of financial support as being one key reason. It's no surprise that funding for wilderness recreation opportunities goes away as a non-essential expense. The CDT, as well as many other maintained trails, are used by a small portion of the population and are seen by many as unneeded. But, as the money wells dry up and individuals have fewer monetary resources, I expect we'll see additional wilderness and conservation organizations being forced to make similar decisions.
Please evaluate your personal contributions to groups that do good things. If you've got extra money, time, or resources that can be used to support a cause with which you agree, please don't put off getting involved until another day. That group may not be around another day.
Hike On
Leave Comment
Posted: 02/01/2012
Posted: 02/01/2012
01/31/2012
Stick Pic
 As the guy usually taking the photos on group hikes, I have only a handful of shots that I'm in after 8 years and hundreds of days camping and backpacking. This morning, I tried out a Stick Pic so I can get in the picture on my long hikes.
In this photo, you can see that a landscape shot can include the hiker, even if he's the only one around. At least it proves that I was actually there!
This works by connecting your camera to the end of your trek pole, setting the timer delay, and then pressing the button. It looks like you've got your own camera crew along because you don't have your arms out holding the camera.
Getting the whole crew in a photo is now pretty easy and that poor old photographer doesn't need to be left out!
Of course, my first video attempt was spinning around in circles :-) but I'm excited to get more experience with this gear so I can get more interesting shots on the trail. Take a look at the short video below to see how it all works and find out how hot it is here in MN today on my 10-mile hike.
The guys that invented the Stick Pic have given me a few to give out as prizes when I return from my Arizona Trail hike. We'll find out who wins in May.
Hike On
Leave Comment
Posted: 01/31/2012
Posted: 01/31/2012
Older Posts Newer Posts
Find more Hiking Resources at www.HikingDude.com


Follow Me
Recent Comments